Step-by-step Integration
First Steps
- Install Nutaku Unity package.
- Basic Balancy integration.
-
Install Balancy Nutaku V2 module.
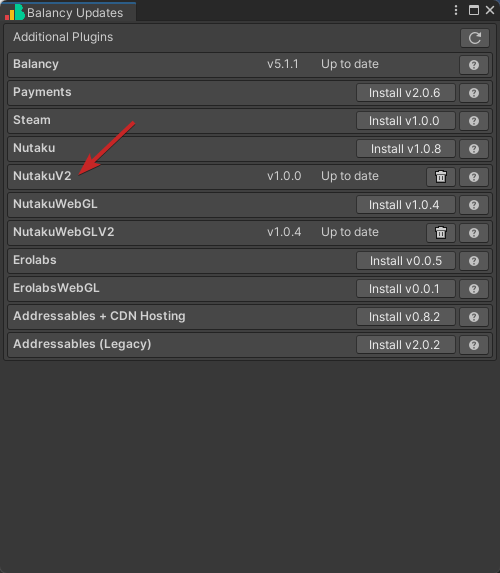
-
Add game in Nutaku dashboard.
- Add Nutaku platform in Balancy on platforms page.
-
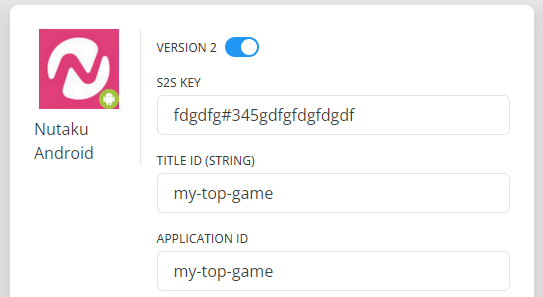
Copy S2S Key, Title id (put it into two field: title id and application id) from Nutaku dashboard to Balancy. Don't forget to turn on Version 2 toggle.
-
On the Nutaku dashboard add Handshake Url and Game Payment Handler Url:
- Handshake Url:
https://webhooks-nutaku-lb-1.prd.balancy.dev/v2/nutaku/handshake/{environment}. - Game Payment Handler Url:
https://webhooks-nutaku-lb-1.prd.balancy.dev/v2/nutaku/payments/{environment}.
Where
{environment}is the environment where you are testing your game on. It can be one of these values: development, stage, production. - Handshake Url:
-
Now you can authorize in Nutaku and buy products using Balancy.
Authorization
Just call NutakuNetwork.NutakuInstance.Login:
NutakuNetwork.NutakuInstance.Login(result =>
{
  if (!result.Success)
      Debug.LogError("Nutaku auth error: " + result.Error.Code + " => " + result.Error.Message);
});
Sandbox
Depending on your implementation, in some cases you need clean login, so call Balancy.Auth.SignOut first and call nutaku login after that in callback.
Payments
In Web build most part is done in Nutaku's UI, but in Android the payments flow could be different. In some cases it works via in-game UI, sometimes using redirection into webview. To handle both cases you need to provide additional callbacks.
In cases of in-game logic you need to pass OnConfirmPurchase callback. Balancy calls it after approve from nutaku (correct item, user has gold). When you receive event in this callback, you need to show confirmation window to user. And pass result of his choice into our callback.
- First, read payments doc and in-game store documentation.
-
Now you can add your own products to use it later. You can do it on the products page.
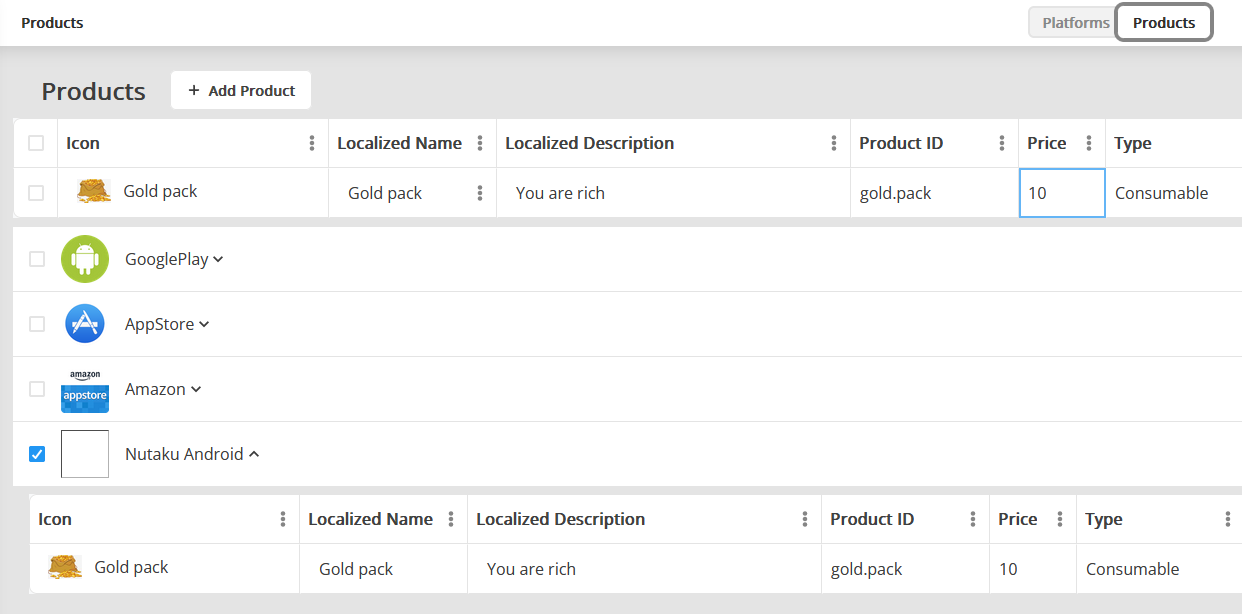
Localized name and localized description are special types. Those strings will automatically use translation depending on user language settings. You can read about our localization system on this page.
-
Deploy changes on Deploy page.
Don't forget to deploy
All changes applied only after deploy. If you change something on the products page, deploy everything before testing.
-
You need to set up in Assets/Plugins/Nutaku/Scripts/NutakuSdkConfig.cs:
loginResultToGameCallbackDelegate. SetBalancy.Platforms.Nutaku.Nutaku.OnLoginResultCallback.paymentBrowserResultToGameCallbackDelegate. SetBalancy.Platforms.Nutaku.Nutaku.OnPaymentResultFromBrowserCallback.
-
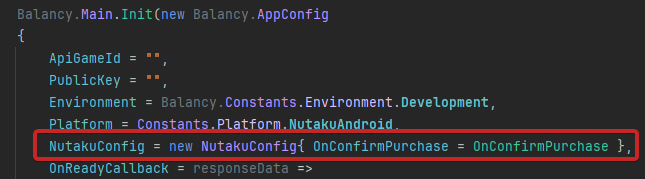
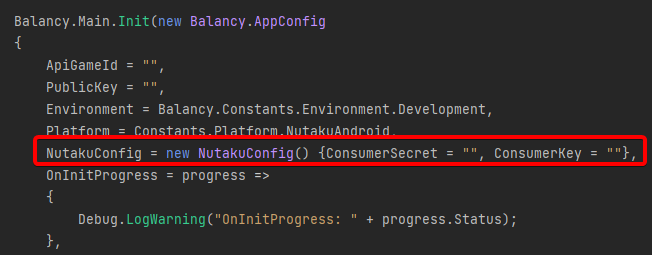
You need to pass
NutakuConfigto the Balancy init method withOnConfirmPurchasecallback. This callback needed for correct payments flow. -
In the simple integration you can just start purchasing process like this:
Payments.PurchaseProduct("gold.pack", res => {
   Debug.Log("Product purchase: " + res.Success);
   if(res.Success) {
       // give your playr gold
   }
});
But we strongly recommend you to use our in-game store.
-
Internally we do all the magic (including server validation).
Potential Issues
Don't use same users on different environments. It will lead to problems with payments handling. We'd recommend to add prefix to your test users, e.g. dev_my_user_1, prod_my_user_1 to differentiate them.
Editor and Android auth flow
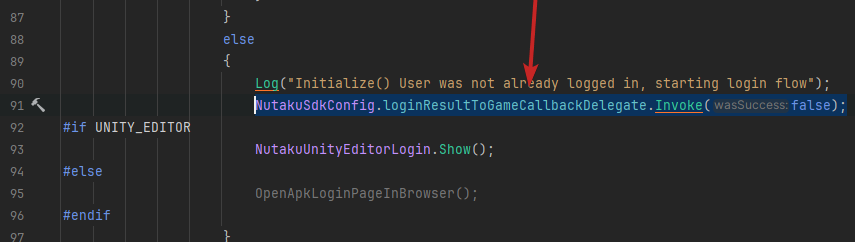
For some reason in Unity loginResultToGameCallbackDelegate could be called twice. If user isn't logged in, this callback will be called with false, and after successful login with true. But if user logged in previous session, this callback with be called only once with true after autologin.
So, because of this behaviour callback on NutakuNetwork.NutakuInstance.Login could be triggered twice. If you don't want such behavior, you can comment 91 line in NutakuSdk.cs:
Testing in Editor
In Editor you can test only game for Android (at least, authorization). You will not able to use an API which displays Nutaku WebView content, so it's imposible to test payments there.
If you want to test the game in Unity Editor, you need to configure 5 fields in the Assets/Plugins/Nutaku/Scripts/NutakuSdkConfig.cs with your sandbox-specific values:
- Environment ("SANDBOX" or "PRODUCTION")
- TitleId (string value)
- AndroidPackageName
loginResultToGameCallbackDelegate. SetBalancy.Platforms.Nutaku.Nutaku.OnLoginResultCallback.paymentBrowserResultToGameCallbackDelegate. SetBalancy.Platforms.Nutaku.Nutaku.OnPaymentResultFromBrowserCallback.
Pass NutakuConfig to the Balancy init method with OnConfirmPurchase callback. This callback needed for correct payments flow.
Platforms
Android
WebGL
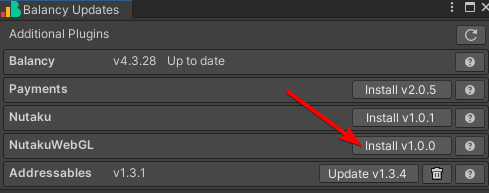
You need to install additional module from the update menu.

Add this line into script section of your root html to make Balancy lib work:
const balancyData = {};
Potential Issues
- Special characters in username. Don't use any special characters in login and nickname rather than number and alphabets.
- Purchase process is not started. Make sure you provided all need information on the Balancy products page: image, name and description are requires fields.
Android
-
Errors on build tools installation.
Failed to install the following SDK components: build-tools;30.0.1 Android SDK Build-Tools 30.0.1 The SDK directory is not writable (C:\Program Files\Unity\Hub\Editor\2021.3.20f1\Editor\Data\PlaybackEngines\AndroidPlayer\SDK)
An error occurs during the tool installation process, usually due to insufficient permissions. Sometimes, you might not even need to install these tools. Check the Android SDK folder at SDK\build-tools; there you will find all installed build tool versions.
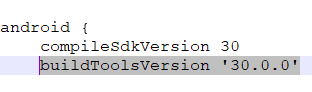
In most cases you can change build tools version in mainTemplate.gradle file to your installed version.
-
Purchase is not correctly completed. Make sure, that you provided need callback inti Balancy
Initmethod and callbacks forloginResultToGameCallbackDelegateandpaymentBrowserResultToGameCallbackDelegate.
Legacy OSAPI
First Steps
- Install Nutaku Unity package.
- Basic Balancy integration.
-
Install Balancy Nutaku module.

-
Add game in Nutaku dashboard.
- Add Nutaku platform in Balancy on platforms page.
-
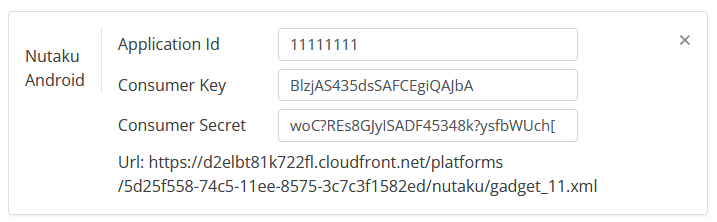
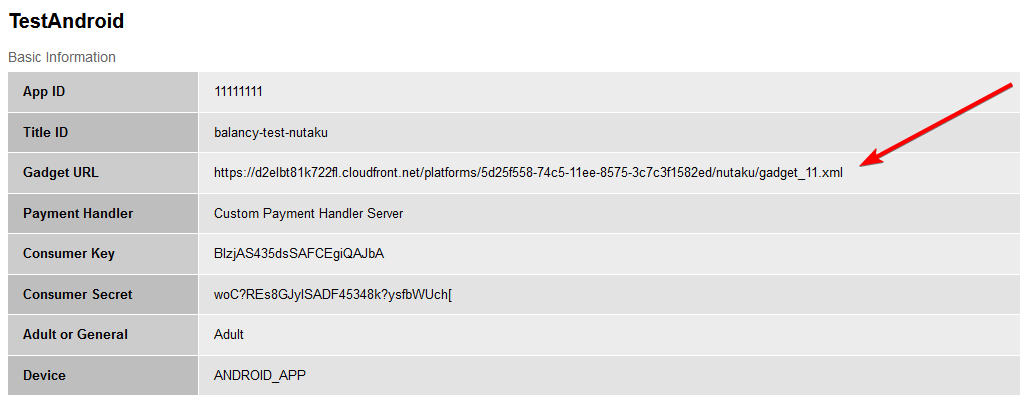
Copy App ID, Consumer Key, Consumer Secret from Nutaku dashboard to Balancy.
-
Copy Url from the bottom of the settings block to game settings in Nutaku dashboard.
-
Now you can authorize in Nutaku and buy products using Balancy.
Sandbox
Usually you start working with Nutaku by creating a sandbox game. In this case change Sandbox flag to true on the platforms page.
Authorization
Just call NutakuNetwork.NutakuInstance.Login:
NutakuNetwork.NutakuInstance.Login(result =>
{
  if (!result.Success)
      Debug.LogError("Nutaku auth error: " + result.Error.Code + " => " + result.Error.Message);
});
Payments
- First, read payments doc and in-game store documentation.
-
Now you can add your own products to use it later. You can do it on the products page.
Localized name and localized description are special types. Those strings will automatically use translation depending on user language settings. You can read about our localization system on this page.
-
Deploy changes on Deploy page.
Don't forget to deploy
All changes applied only after deploy. If you change something on the products page, deploy everything before testing.
-
In the simple integration you can just start purchasing process like this:
Payments.PurchaseProduct("gold.pack", res => {
   Debug.Log("Product purchase: " + res.Success);
   if(res.Success) {
       // give your playr gold
   }
});
But we strongly recommend you to use our in-game store.
-
Internally we do all the magic (including server validation).
Potential Issues
Don't use same users on different environments. It will lead to problems with payments handling. We'd recommend to add prefix to your test users, e.g. dev_my_user_1, prod_my_user_1 to differentiate them.
Testing in Editor
In Editor you can test only sandbox game. Also, you will not able to use an API which displays Nutaku WebView content, so it's imposible to test payments there.
If you want to test the game in Unity Editor, you need to configure 3 fields in the Assets/Plugins/Nutaku/Scripts/Internal/NativePluginStub.cs with your sandbox-specific values:
- SandboxAppId
- SandboxConsumerKey
- SandboxConsumerSecret

Platforms
Android
Pass NutakuConfig to the Balancy init method with Nutaku's keys.
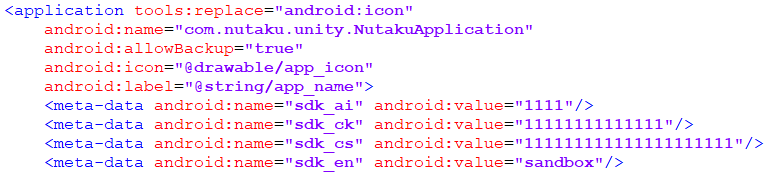
And don't forget to set Nutaku keys and app id in the AndroidManifest (or gradle template)!
WebGL
You need to install additional module from the update menu.
Gadget.xml
Don't forget to add required features and payment handler into ModulePrefs block:
<ModulePrefs title="My Nutaku Game" author="DefaultCompany" thumbnail="" screenshot="" height="600" width="960">
    <Require feature="opensocial-0.8"/>
    <Require feature="opensocial-payment"/>
    <Require feature="nutaku"/>
    <Require feature="dynamic-height" />
    <Link rel="payment.handler" href="https://nutaku-1.webhooks.balancy.dev/v1/nutaku/confirmation"/>
</ModulePrefs>
Also, add this line into script section of CDATA to make Balancy lib work:
const balancyData = {};
Custom Template
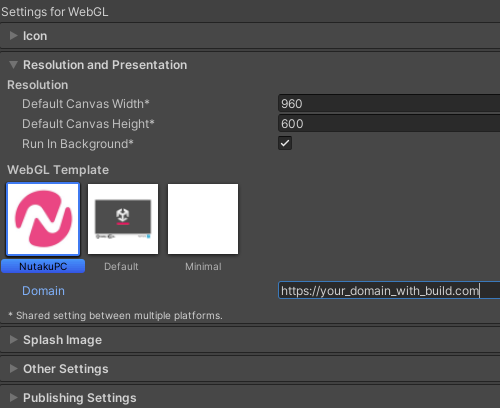
Optionally you can install our sample WebGL template, which help with basic gadget.xml file generating. Download it here and unzip into Assets/WebGLTemplates directory. You can read additional info about custom templates in Unity documentation.
After that you will be able to make WebGL build from it. You only need to set your domain (where you upload game build) in additional field.
You can use the resulted file as is. Upload it into your server and put into Gadget URL field on your game settings page in Nutaku dashboard.
Cache issue
Don't forget to setup expiration time for gadget.xml and your game build files. If you set it too big, Nutaku potentially could cache it, and users will see updates with a delay.
SP platform
You can release your game for mobile browsers, but it works differently from PC.
-
First of all you need to creat Gadget XML. You can use the same file for both PC and SP browser platform.
<Content view="touch" type="url" href="https://nutaku-1.webhooks.balancy.dev/v1/nutaku/play/dev" allow_domains="nutaku-1.webhooks.balancy.dev, balancy.dev" /> // this one is for SP
<Content type="html" view="canvas"> this one is for PC
[...]
</Content>
For SP platform you need to specify Balancy's url:
https://nutaku-1.webhooks.balancy.dev/v1/nutaku/play/<environment>. Where environment can be on of these values: dev, stage, production. -
Add SP platform on Balancy platforms page.
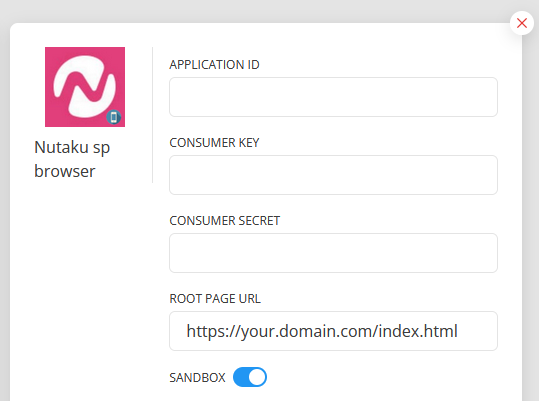
Root page url is a root url of your game build (basically, html page).
-
Depending on type of your nutaku environment (production or sandbox) add specific nutaku script url into meta part of your html.
- https://sbox-osapi.nutaku.com/gadgets/js/sp-net.js for sandbox game.
- https://osapi.nutaku.com/gadgets/js/sp-net.js for production game.

How the flow for SP looks like:
- User opens nutaku game page.
- Nutaku calls our server (the url you provided in gadget.xml).
- Our server downloads html page (the url you provided on the Balancy platforms page) and returns it to nutaku.
SP platform payments
Payments here works via redirects. You can get general understanding of the process reading Nutaku's documentation, but, basically:
- When user wants to buy something, he will be redirected to a specific page.
- After the purchase:
- We add the purchase to the pending list on our backend.
- User will be redirected to the root game page, and the game will be loaded again.
- Now you need to send
Payments.GetPurchases(Constants.PurchaseStatusFilter.Pendingrequest to our server to get this pending purchase to proceed. - After that you need to complete purchase by using
Payments.CompletePurchasemethod. - In response, you will get type of the purchase and needed info to give reward.
- If it was the offer, you will get
OfferInfoandStoreItem. - For OfferGroup purchase, you will get
OfferGroupInfoandStoreItem.
- If it was the offer, you will get
Purchase completing work only on same machine
Balancy stores purchase intention info locally, so we will be able to get this info for completing the purchase. That's why it works only if you proceed payments on the same device where the purchase was made.
Potential Issues
- Special characters in user name. Don't use any special characters in login and nickname rather than number and alphabets.
Android
-
Errors on build tools installation.
Failed to install the following SDK components: build-tools;30.0.1 Android SDK Build-Tools 30.0.1 The SDK directory is not writable (C:\Program Files\Unity\Hub\Editor\2021.3.20f1\Editor\Data\PlaybackEngines\AndroidPlayer\SDK)
An error occurs during the tool installation process, usually due to insufficient permissions. Sometimes, you might not even need to install these tools. Check the Android SDK folder at SDK\build-tools; there you will find all installed build tool versions.
In most cases you can change build tools version in mainTemplate.gradle file to your installed version.