All Nodes
Dynamic Nodes
Nodes in this category can change their ports depending on the option that you pick from the node's selection menu.
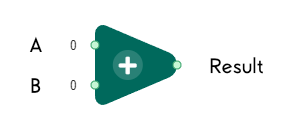
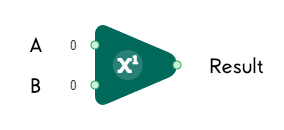
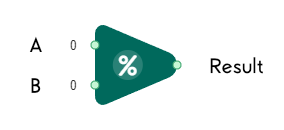
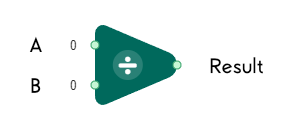
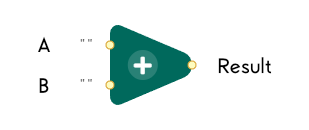
Operator
The Operator Node takes in the values from its Input Ports, A and B, processes them depending on the chosen operator, and outputs the resulting value into the Result Output Port. The operations that can be chosen are listed below.
Numbers
Add
Returns the sum of the inputs A and B.
Example:
A = 5; B = 10
Result = 15
Subtract
Returns the difference between the inputs A and B.
Example:
A = 5; B = 10
Result = -5

Multiply
Returns the product of the inputs A and B.
Example:
A = 5; B = 10
Result = 50

Divide
Returns the quotient between the inputs A and B. Note that if the divisor, B, is 0, this operation will cause an error.
Example:
A = 5; B = 10
Result = 0.5

Power
Returns the result of raising the input A to the power of input B.
Example:
A = 5; B = 10
Result = 9765625
Modulo
Returns the remainder of the division between inputs A and B.
Examples:
A = 5; B = 2
Result = 1A = -5; B = 2
Result = 1A = 5; B = -2
Result = -1A = -5; B = -2
Result = -1
Divide and Floor
Calculates the quotient between inputs A and B, and returns the floor (next lower integer) of the quotient.
Examples:
A = 7; B = 3
Result = 2A = 3.14; B = 1.62
Result = 1
Note: Temporarily, the symbol for Divide and Floor Node is the same as Divide Node. This will be fixed in the future.
Strings
Concat
Joins the string inputs A and B together into one and returns the joined string. Note that strings joined this way won't automatically have a space between the strings.
Example:
A = "Hello,"; B = "World!"
Result = "Hello,World!"
Booleans
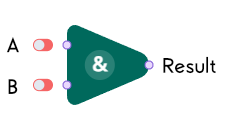
And
Returns the boolean value of true if both inputs A and B are true, and false otherwise.
Examples:
A = true; B = true
Result = trueA = true; B = false
Result = false
Or
Returns the boolean value of true if at least one among the inputs A and B are true, and false otherwise.
Examples:
A = true; B = false
Result = trueA = false; B = false
Result = false
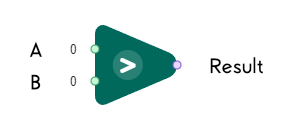
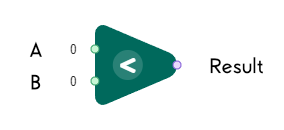
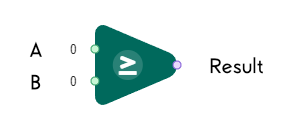
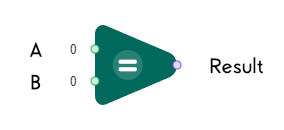
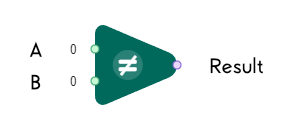
Comparator
The Comparator Node takes in the values from its Input Ports, A and B, processes them depending on the chosen comparator, and outputs either true or false into the Result Output Port. The operations that can be chosen are listed below.
Numbers
Greater
Compares input A from input B and returns true if A is greater than B; returns false otherwise.
Examples:
A = 2; B = 1
Result = trueA = 1; B = 1
Result = false
Lower
Compares input A from input B and returns true if A is less than B; returns false otherwise.
Examples:
A = 1; B = 2
Result = trueA = 2; B = 2
Result = false
Greater Or Equal
Compares input A from input B and returns true if A is greater than or equal to B; returns false otherwise.
Examples:
A = 2; B = 1
Result = trueA = 1; B = 1
Result = trueA = 0; B = 1
Result = false
Lower Or Equal
Compares input A from input B and returns true if A is less than or equal to B; returns false otherwise.
Examples:
A = 1; B = 2
Result = trueA = 2; B = 2
Result = trueA = 3; B = 2
Result = false

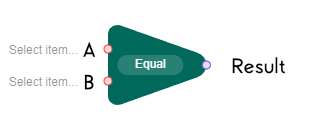
Equal
Compares input A from input B and returns true if A is exactly equal to B; returns false otherwise.
Examples:
A = 1; B = 1
Result = trueA = 1.00001; B = 1
Result = false
Not Equal
Compares input A from input B and returns true if A is not equal to B; returns false otherwise.
Examples:
A = 1; B = 1
Result = falseA = 1.00001; B = 1
Result = true
Strings
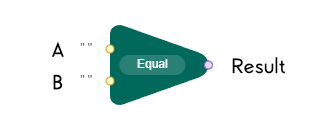
Equal
Compares input A from input B and returns true if A is equal, character by character, to B; returns false otherwise.
Examples:
A = "Hello"; B = "Hello"
Result = trueA = "Hello"; B = "hello"
Result = false
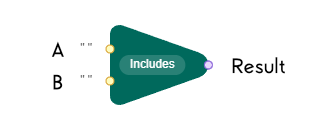
Includes
Compares input A from input B and returns true if A has consecutive characters equal to B; returns false otherwise.
Examples:
A = "How are you?"; B = "are y"
Result = trueA = "How are you?"; B = "How are you?"
Result = trueA = "How are you?"; B = "ow Are"
Result = falseA = "How are you?"; B = "warey"
Result = false
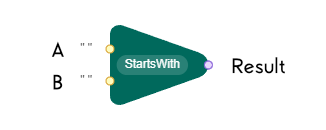
StartsWith
Compares input A from input B and returns true if A has starting characters equal to B; returns false otherwise.
Examples:
A = "How are you?"; B = "How are"
Result = trueA = "How are you?"; B = "How are you?"
Result = trueA = "How are you?"; B = "How Are"
Result = falseA = "How are you?"; B = "Howareyou?"
Result = false
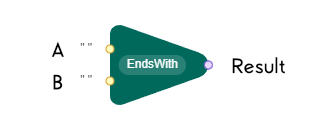
EndsWith
Compares input A from input B and returns true if A has ending characters equal to B; returns false otherwise.
Examples:
A = "How are you?"; B = "are you?"
Result = trueA = "How are you?"; B = "How are you?"
Result = trueA = "How are you?"; B = "Are You?"
Result = falseA = "How are you?"; B = "Howareyou?"
Result = false
Documents
Equal
Compares input A from input B and returns true if the document GUIDs of both inputs A and B are equal.
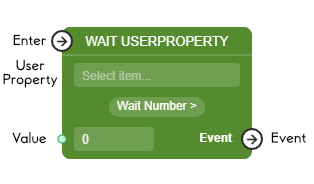
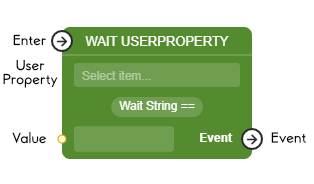
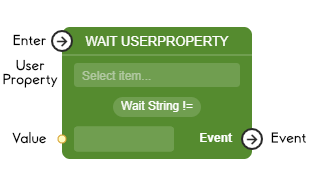
Wait UserProperty
The Wait UserProperty Node evaluates the value of the selected User Property parameter and compares it to the value of the Value Input Port based on the chosen comparator. If this comparison returns true, the Event Exit Port is activated. Otherwise, the node simply waits until evaluated User Property value satisfies the specified comparison.
This node is subscription node - that means that upon activation is subscribes for event and triggers when event happens. One activation results in one triggering. To subscribe again, the control Flow should etner this node again. If Enter port is left not connected, it will automatically subscribe once the script starts.
Note: When selecting the User Property parameter, the selected comparator will automatically update and select the most appropriate comparator based on the type of the User Property parameter:
Wait Number >for numbers,Wait String ==for strings, andWait Boolfor booleans.Furthermore, the choice of selectable comparators will be limited based on the type of the User Property parameter.
Numbers
There are 6 different comparators for number-typed User Property parameters: greater, lower, greater or equal, lower or equal, equal, and not equal. These work the same as the Comparators for Numbers, where input A is the User Property value, and input B is the Value Input Port.
Strings
There are 2 different comparators for string-typed User Property parameters: equal and not equal.
Equal
Compares the User Property Value from input Value and returns true if the User Property Value is equal, character by character, to Value; returns false otherwise.
Not Equal
Compares the User Property Value from input Value and returns true if the User Property Value is not equal, character by character, to Value; returns false otherwise.
Booleans
There is only 1 choice of comparator for boolean-typed User Property parameters: equal.
Equal
Compares the User Property Value from input Value and returns true if the User Property Value and Value is both true or both false; returns false otherwise.

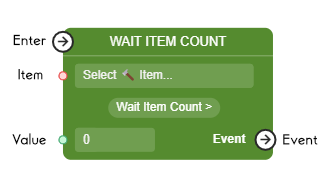
Wait Item Count
The Wait Item Count Node checks how many of the selected Item is in the end user's inventory, and compares it to the value of the Value Input Port based on the chosen comparator. If this comparison returns true, the Event Exit Port is activated. Otherwise, the node simply waits until the Item count satisfies the specified comparison.
This node is subscription node - that means that upon activation is subscribes for event and triggers when event happens. One activation results in one triggering. To subscribe again, the control Flow should etner this node again. If Enter port is left not connected, it will automatically subscribe once the script starts.
Comparators
Since the Item count is a number, there are 6 different comparators for it: greater, lower, greater or equal, lower or equal, equal, and not equal. These work the same as the Comparators for Numbers, where input A is the Item count, and input B is the Value Input Port.
Numbers: Range Nodes
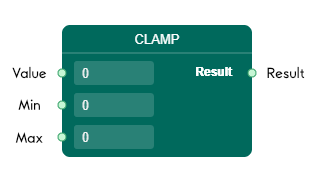
Clamp
The Clamp Node takes in the input Value and keeps it between the the input Min and input Max values. If the Value is less than the Min value, the Min value is returned. If the Value is greater than the Max value, the Max value is returned. Otherwise, the Value is returned into the output Result.
This can be useful for limiting the Value within some common value ranges such as 0 to 1 or 0 to 100.
Examples:
Value = 0.3; Min = 0; Max = 1
Result = 0.3Value = 150; Min = 0; Max = 100
Result = 100Value = -10; Min = 0; Max = 64
Result = 0
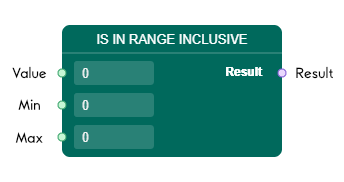
Is In Range (Inclusive)
The Is In Range (Inclusive) Node takes in the input Value and returns true if both these conditions are satisfied:
Valueis greater or equal to the inputMinvalueValueis lower or equal to the inputMaxvalue
Otherwise, the boolean value false is returned into the output Result.
Examples:
Value = 0.3; Min = 0; Max = 1
Result = trueValue = 100; Min = 0; Max = 100
Result = trueValue = 0; Min = 0; Max = 64
Result = trueValue = 150; Min = 0; Max = 100
Result = falseValue = -10; Min = 0; Max = 64
Result = false
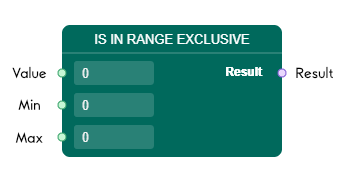
Is In Range (Exclusive)
The Is In Range (Exclusive) Node takes in the input Value and returns true if both these conditions are satisfied:
Valueis greater than the inputMinvalueValueis lower than the inputMaxvalue
Otherwise, the boolean value false is returned into the output Result.
Examples:
Value = 0.3; Min = 0; Max = 1
Result = trueValue = 100; Min = 0; Max = 100
Result = falseValue = 0; Min = 0; Max = 64
Result = falseValue = 150; Min = 0; Max = 100
Result = falseValue = -10; Min = 0; Max = 64
Result = false
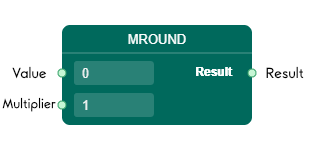
MRound (Multiple Round)
The MRound Node takes in the input Value, rounds it to the nearest multiple of the input Multiplier value, and returns this value into the output Result.
Examples:
Value = 16; Multiplier = 3
Result = 15Value = 5; Multiplier = 2
Result = 6
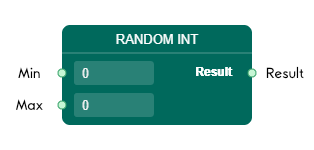
Random Int
The Random Int Node takes in the inputs Min and Max, and generates an integer within the range of Min and Max values. Min specifies the inclusive lower bound of the range, while Max specifies the exclusive upper bound of the range. The value generated is returned into the output Result.
Examples:
Min = 0; Max = 100
Result = 15Min = 0; Max = 100
Result = 0Min = 0; Max = 100
Result = 99
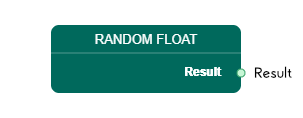
Random Float
The Random Float Node generates a float value within 0 and 1, where 0 is inclusive and 1 is exclusive. The value generated is returned into the output Result.
Converter Nodes
String To Number
The String To Number Node takes in the input Value, converts it from String type to Decimal type using Convert.ToDecimal(), and outputs the converted value to the output Result.

Logic: Branch Nodes
Nodes within this section have direct control over the Control Flow of the Script; they can redirect the flow paths into different branches depending on the input values given to them.
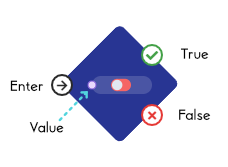
If
The If Node works exactly like If statements in other programming languages. This node takes the Control Flow entering through the Enter port and redirects it to either the True or False exit ports depending on the boolean value of the input Value. If Value is true, the Control Flow is redirected to the True exit port; otherwise, it is instead redirected to the False exit port.
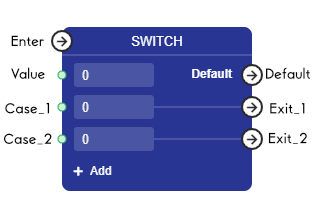
Switch
The Switch Node works exactly like Switch/Case statements in other programming languages. This node reads the number value from the input Value port and compares it to the other input Case_# ports. If Value equals one of the Case_# number values, this node will take the Control Flow entering through the Enter port and redirect it to the Exit port connected to the equaling Case_# port. If Value does not equal any of the Case_# number values, the Control Flow is instead redirected to the Default exit port.
More cases can be added by clicking on the + Add button on the node. To delete a case, simply hover over the case you'd like to delete and click on the button with the minus symbol.
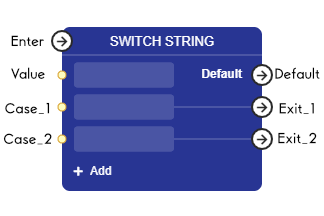
Switch String
The Switch String Node works exactly like Switch/Case statements in other programming languages and the Switch Node above. However, this node works with String types instead of Number types. This node reads the string value from the input Value port and compares it to the other input Case_# ports. If Value equals one of the Case_# string values, this node will take the Control Flow entering through the Enter port and redirect it to the Exit port connected to the equaling Case_# port. If Value does not equal any of theCase_# string values, the Control Flow is instead redirected to the Default exit port.
More cases can be added by clicking on the + Add button on the node. To delete a case, simply hover over the case you'd like to delete and click on the button with the minus symbol.
Logic: Boolean Nodes
Not
The Not Node takes in the boolean value passed into the input Bool Value, inverts this boolean value, and returns this inverted value to the output Not port. If the Bool Value is true, the inverted value returned is false. Otherwise, the inverted value returned is true.
Examples:
Bool Value = true
Not = falseBool Value = false
Not = true

Logic: Loop Nodes
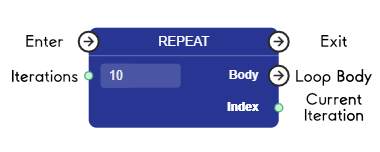
Repeat
The Repeat Node takes in an input Iterations number and for each iteration, the Control Flow is passed to the Body exit port, and the current iteration number is returned through the Index output port. The Index returned will be from 0 to the number of iterations minus one. For example, if the Iterations is 10, the Index returned will be from 0 to 9.
Once the node is done repeating based on the number of iterations, the Control Flow is then passed to the Exit port.
User Profile Nodes
Nodes within this section work directly with the User Profile and can either retrieve values from or update values into the User Profile.
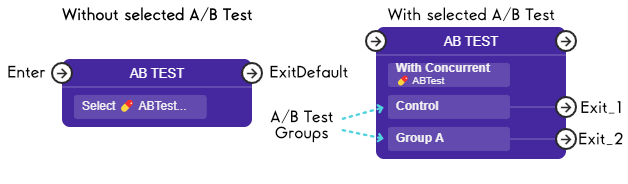
AB Test
The AB Test Node works directly with the A/B Tests created within the A/B Tests section of LiveOps. Before working with this node, first make sure that you have an A/B Test created. Once you have an A/B Test you can use, select it by clicking on the Select ABTest... button on the node and choose the A/B Test you would like to use. The test groups of chosen A/B Test should automatically be shown, along with their connected Exit ports.
This node runs the Exit_# port connected to the test group that the end user is currently in. If the end user is not in any one of the test groups, the ExitDefault port runs instead.
Upon stopping the A/B Test, choosing a test group as the best, and applying all the changes, the AB Test nodes referencing this A/B Test, along with any of their connected links, will be deleted. A link will then be created between the port connected to the AB Test's Enter port and the port connected to the chosen test group's Exit_# port.
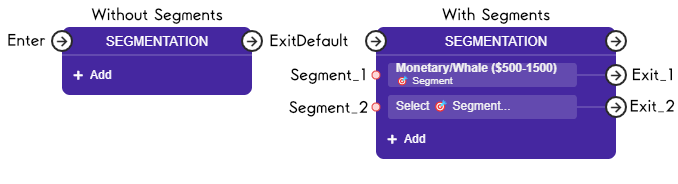
Segmentation
The Segmentation Node works directly with the Segments created within the Segmentation section of LiveOps. Before working with this node, first make sure that you have a Segment created. Once you have a Segment you can use, first click the + Add button and select it by clicking on the Select Segment... button on the node and choose the Segment you would like to use.
This node runs the Exit_# port connected to the Segment that the end user is currently in. If the end user is not in any one of the Segments, the ExitDefault port runs instead.
More Segments can be added by clicking on the + Add button on the node. To delete a Segment, simply hover over the case you'd like to delete and click on the button with the minus symbol.
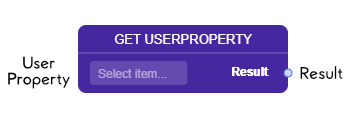
Get UserProperty
The Get UserProperty Node is used to directly retrieve values from the User Profile. To select the User Profile parameter you'd like to retrieve the value from, simply click on the Select Item... button on the node. This will show all the parameters within Default and System Profiles, and within any custom SmartObjects you have created. Check out the Smart Objects section for more info.
Once the User Profile parameter is chosen, the value is returned through the output Result port. Note that the Result port is typed as Object, which means it can return any types of values and can be connected to any type of value ports. Make sure to check if the type of the value retrieved from the User Profile is compatible with the type of the value port you want to connect this Result port to.
Tip: The type of the value of the parameter from the User Profile can be checked in the selection menu of all the available User Profile parameters upon clicking on the
Select Item...button on the node. Types surrounded by brackets[ ]signifies that this is a List of this type. For example, the type[Integer]means this User Profile parameter will return a List of Integers instead of a single Integer.
Below are nodes that retrieve values from specific User Profile parameters and are created for convenience.
Get Playtime
Returns the User Profile parameter System ▸ General Info ▸ Play Time (Integer).

Get Time Since Install
Returns the User Profile parameter System ▸ General Info ▸ Time Since Install Passed (Integer).

Total Spend
Returns the User Profile parameter System ▸ Payments ▸ Total Spend (Float).

Max Pay
Returns the User Profile parameter System ▸ Payments ▸ Max Payment (Float).

Last Pay Time
Returns the User Profile parameter System ▸ Payments ▸ Last Payment Time (Integer).

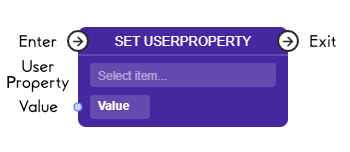
Set UserProperty
The Set UserProperty Node is used to directly set a value to the User Profile. To select the User Profile parameter you'd like to set the value for, simply click on the Select Item... button on the node. This will show all the parameters within Default and System Profiles, and within any custom SmartObjects you have created. Check out the Smart Objects section for more info.
Once the User Profile parameter is chosen, the value passed into the input Value port will be set into the User Profile parameter when this node activates. Note that the Value port is typed as Object, which means it can accept any types of values and can be connected to any type of value ports. Make sure to check if the type of the value port you want to connect this Value port to is compatible with the type of the value that the selected User Profile parameter accepts. Check the tip under the Get UserProperty Node section for more details.
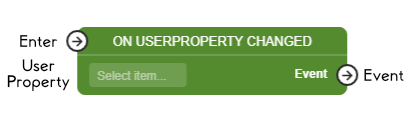
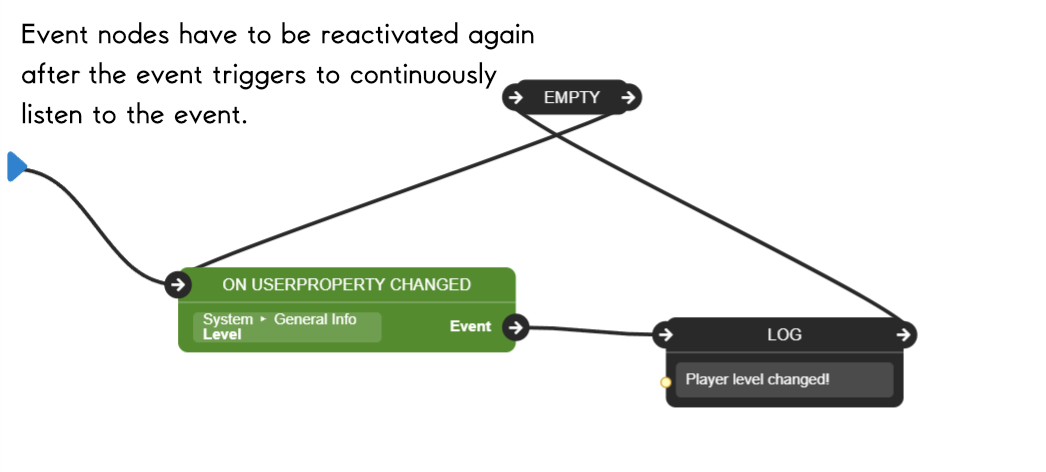
On UserProperty Changed
The On UserProperty Changed Node is an Event Node that notifies the connected node if the value of the selected User Profile parameter has changed. To select the User Profile parameter you'd like to be notified for, simply click on the Select Item... button on the node. This will show all the parameters within Default and System Profiles, and within any custom SmartObjects you have created. Check out the Smart Objects section for more info.
This node is subscription node - that means that upon activation is subscribes for event and triggers when event happens. One activation results in one triggering. To subscribe again, the control Flow should etner this node again. If Enter port is left not connected, it will automatically subscribe once the script starts.
Once the User Profile parameter is chosen, this node runs the Event exit port when the value of the User Profile parameter has changed.
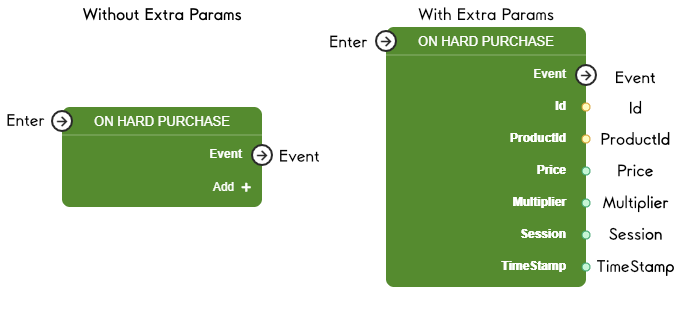
On Hard Purchase
The On Hard Purchase Node is an Event Node that notifies the connected node if the end user has made a purchase using hard or real currency. Once a hard purchase is made by the end user, this node runs the Event exit port.
This node is subscription node - that means that upon activation is subscribes for event and triggers when event happens. One activation results in one triggering. To subscribe again, the control Flow should etner this node again. If Enter port is left not connected, it will automatically subscribe once the script starts.
This node also has some output ports that provide some information about the purchase. These output ports are:
- Id - The document id of the item purchased. The document can either be a Game Offer or a Store Item.
- ProductId - The id of the product related to the item purchased. The list of products can be found in Products page.
- Price - The amount of hard currency paid in USD.
- Multiplier - How much the provided resources should be multiplied. This depends on either the multiplier set on the In-Game Store for certain Store Items, or in the User Profile parameter
System ▸ Payments ▸ Resources Multiplier (Float). - Session - The end user's session number when this purchase was made. This could be found in the User Profile parameter
System ▸ General Info ▸ Session (Integer). - TimeStamp - The time the purchase was made in Unix seconds.
Note: These output ports can be shown by clicking on the
Add +button on the node and selecting the port you'd like to expose. Upon reloading the Script, if the port is not connected to anything, the port will automatically be hidden.
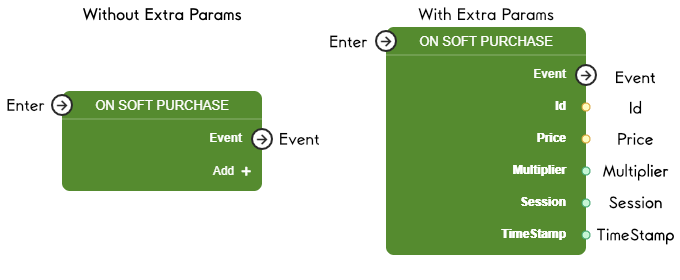
On Soft Purchase
The On Soft Purchase Node is an Event Node that notifies the connected node if the end user has made a purchase using soft or virtual currency. Once a soft purchase is made by the end user, this node runs the Event exit port.
This node is subscription node - that means that upon activation is subscribes for event and triggers when event happens. One activation results in one triggering. To subscribe again, the control Flow should etner this node again. If Enter port is left not connected, it will automatically subscribe once the script starts.
This node also has some output ports that provide some information about the purchase. These output ports are:
- Id - The document id of the item purchased. The document can either be a Game Offer or a Store Item.
- Price - The document id of the price. This price can be set on the Store Item documents.
- Multiplier - How much the provided resources should be multiplied. This depends on either the multiplier set on the In-Game Store for certain Store Items, or in the User Profile parameter
System ▸ Payments ▸ Resources Multiplier (Float). - Session - The end user's session number when this purchase was made. This could be found in the User Profile parameter
System ▸ General Info ▸ Session (Integer). - TimeStamp - The time the purchase was made in Unix seconds.
Note: These output ports can be shown by clicking on the
Add +button on the node and selecting the port you'd like to expose. Upon reloading the Script, if the port is not connected to anything, the port will automatically be hidden.
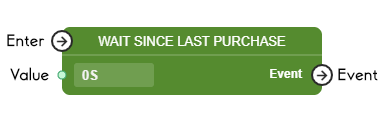
Wait Since Last Purchase
The Wait Since Last Purchase Node is an Event Node that notifies the connected node when the specified duration has passed since the end user's last purchase. Once the duration specified in the input Value port has passed, this node runs the Event exit port.
This node is subscription node - that means that upon activation is subscribes for event and triggers when event happens. One activation results in one triggering. To subscribe again, the control Flow should etner this node again. If Enter port is left not connected, it will automatically subscribe once the script starts.
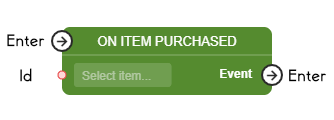
On Item Purchased
The On Item Purchased Node is an Event Node that notifies the connected node when the specified item has been purchased by the end user. To select the item you'd like to be notified for, simply click on the Select Item... button on the node. This will let you choose the template and document to be notified for. Only Store Items should be chosen in this field.
This node is subscription node - that means that upon activation is subscribes for event and triggers when event happens. One activation results in one triggering. To subscribe again, the control Flow should etner this node again. If Enter port is left not connected, it will automatically subscribe once the script starts.
Once the item specified in the input Id port has been purchased, this node runs the Event exit port.
Was Item Purchased
The Was Item Purchased Node runs either the True or False exit ports depending on whether the selected Store Item has been purchased by the end user. To select the item you'd like to check for, simply click on the Select Store Item... button on the node. If the Store Item has been purchased, the True exit port is run; otherwise, the False exit port runs instead.
This node also has some output ports that provide some information about the purchase. These output ports are:
- Price - The amount of hard currency paid in USD. If the purchase was made using soft currency, this price is instead set to 0.
-
TimeStamp - The time the purchase was made in Unix seconds.
-
ProductId - The id of the product related to the item purchased. If the purchase was made using soft currency, this productId is instead set to null. The list of products can be found in Products page.
- Session - The end user's session number when this purchase was made. This could be found in the User Profile parameter
System ▸ General Info ▸ Session (Integer). - Multiplier - How much the provided resources should be multiplied. This depends on either the multiplier set on the In-Game Store for certain Store Items, or in the User Profile parameter
System ▸ Payments ▸ Resources Multiplier (Float).
Attachments can also be added to this node. Check out the Attachments section to learn more about this feature.

List Nodes
Nodes within this section are for processing and manipulating lists of primitive types and objects.
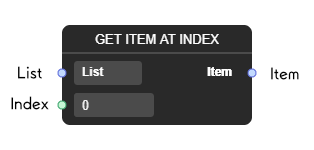
Get Item At Index
The Get Item At Index Node takes in an input List and an input Index, retrieves the item stored in the given index position of the list, and returns this item through the output Item port.
The list is 0-indexed, which means that the first item has the index of 0, the second has index 1, third has index 2, and so on.
If the index is not within the bounds of the list, an error is printed into the console.
Examples:
List = [ 1, 5, 2, 4 ]; Index = 0
Item = 1List = [ 1, 5, 2, 4 ]; Index = 3
Item = 4
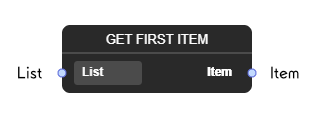
Get First Item
The Get First Item Node takes in an input List, retrieves the first item stored in the given index position of the list, and returns this item through the output Item port. If the list is empty and there is no first item found, an error is printed into the console.
Examples:
List = [ 1, 5, 2, 4 ]
Item = 1
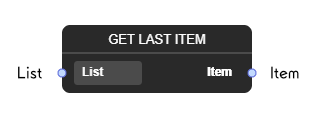
Get Last Item
The Get Last Item Node takes in an input List, retrieves the last item stored in the given index position of the list, and returns this item through the output Item port. If the list is empty and there is no last item found, an error is printed into the console.
Examples:
List = [ 1, 5, 2, 4 ]
Item = 4
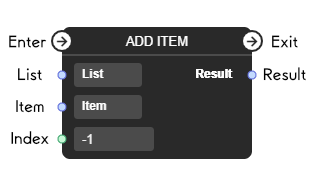
Add Item
The Add Item Node takes in an input List, an input Item, and an input Index. Depending on the Index value, the Item value is inserted into the List at the given index. The list with the inserted item is then returned through the output Result port.
The list is 0-indexed, which means that the first item has the index of 0, the second has index 1, third has index 2, and so on. If the index given is -1, the item is added at the end of the list.
If the index given is a number other than -1, the item is inserted immediately to the left of the item currently positioned in the specified index, pushing all the items after it one index to the right. For example, if an item is inserted to index 3, the item that was previously at index 3 will now be at index 4, and the new item will have an index of 3. The length of the list is also increased by 1.
If the index is less than -1 or greater than the length of the list, an error is printed into the console.
Examples:
List = [ 1, 5, 2, 4 ]; Item = 3; Index = -1
Result = [ 1, 5, 2, 4, 3 ]List = [ 1, 5, 2, 4 ]; Item = 3; Index = 0
Result = [ 3, 1, 5, 2, 4 ]List = [ 1, 5, 2, 4 ]; Item = 3; Index = 2
Result = [ 1, 5, 3, 2, 4 ]
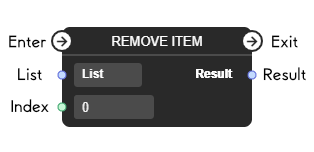
Remove Item
The Remove Item Node takes in an input List and an input Index. Depending on the Index value, the item stored at the given index is removed. The list with the removed item is then returned through the output Result port.
The list is 0-indexed, which means that the first item has the index of 0, the second has index 1, third has index 2, and so on. The item at the given index is removed from the list, and all the items to the right of it will move to the left by one index. For example, if an item is at index 3, when this item is removed, the item that was previously at index 4 will now be at index 3, the item previously at index 5 will be at index 4, and so on. The length of the list is also decreased by 1.
If the index is less than 0 or greater or equal to the length of the list, an error is printed into the console.
Examples:
List = [ 1, 5, 2, 4 ]; Index = 0
Result = [ 5, 2, 4 ]List = [ 1, 5, 2, 4 ]; Index = 2
Result = [ 1, 5, 4 ]
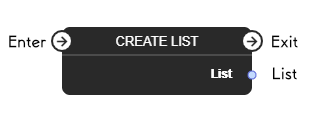
Create List
The Create List Node creates a new, empty list and returns the created list through the output Result port.
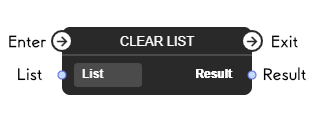
Clear List
The Clear List Node takes in an input List, deletes all items within this list, and returns the cleared list through the output Result port.
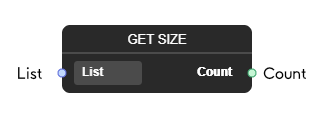
Get Size
The Get Size Node takes in an input List and returns the count or length of this list through the output Count port.
Example:
List = [ 1, 5, 2, 4 ]
Count = 4
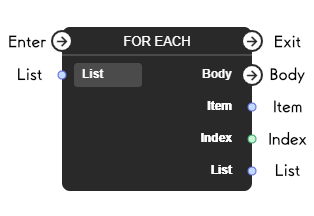
For Each
The For Each Node takes in an input List and goes through each item in the list, one by one. For each of the items that this node goes through, the Control Flow is passed to the Body exit port, and values are returned through the Item, Index, and List output ports. The value returned through:
- the output
Itemport is the current item - the output
Indexport is the current item's index - the output
Listport is the list's current state
Once the node is done going through all the items, the Control Flow is then passed to the Exit port.
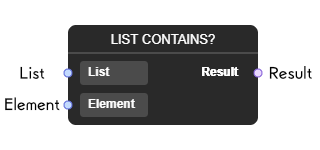
List Contains?
The List Contains? Node takes in an input List and an input Element. If the element is found in the list, the boolean value true is returned; otherwise, the boolean value false is returned through the output Result port.
Examples:
List = [ 1, 5, 2, 4 ]; Element = 3
Result = falseList = [ 1, 5, 2, 4 ]; Element = 5
Result = true
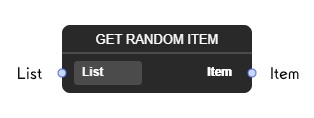
Get Random Item
The Get Random Item Node takes in an input List, picks an item within this list randomly, and returns the picked item through the output Item port.
Examples:
List = [ 1, 5, 2, 4 ]
Item = 2List = [ 1, 5, 2, 4 ]
Item = 4
Inventory Nodes
Nodes within this section are for accessing and editing the end user's inventory. Check out the Inventory section for more info.
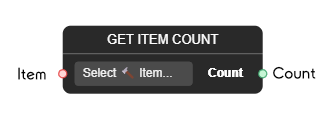
Get Item Count
The Get Item Count Node is useful for getting the current amount of the specified Item in the end user's inventories. This node will check all the inventory slots within the available inventory systems - Currencies and General Storage by default - and counts the amount of the specified Item in the inventories. This total amount is then passed to the output Count port.
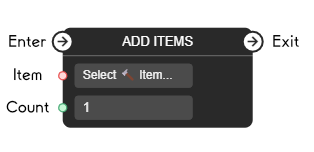
Add Items
The Add Items Node is useful for adding the specified Item into the end user's inventories. The value of the input Count port can also be used to specify how many of the Item should be added.
Note: The input
Countport can neither be negative nor zero. If you wish to remove items from the inventory, please use the Remove Items node instead.
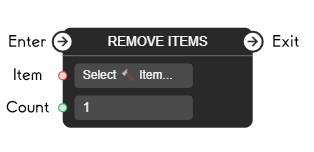
Remove Items
The Remove Items Node is useful for removing the specified Item from the end user's inventories. The value of the input Count port can also be used to specify how many of the Item should be removed.
Note: The input
Countport can neither be negative nor zero. If you wish to add items to the inventory, please use the Add Items node instead.
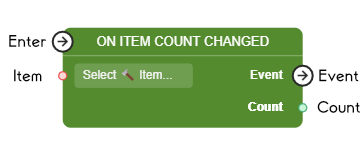
On Item Count Changed
The On Item Count Changed Node is an Event Node that notifies the connected node if the amount of the specified Item in the inventory has changed. To select the Item you'd like to be notified the changed amount for, simply click on the Select Item... button on the node. This will show all the documents of the Item template and its child templates. Check out the Offers & Items section for more info.
This node is subscription node - that means that upon activation is subscribes for event and triggers when event happens. One activation results in one triggering. To subscribe again, the control Flow should etner this node again. If Enter port is left not connected, it will automatically subscribe once the script starts.
Once the Item is chosen, this node runs the Event exit port when the amount of the Item in the inventory has changed.
Document Nodes
Nodes within this section are for retrieving and reading from Documents from tables. Note that these nodes cannot change the values stored in Documents in the tables during the runtime of the Script.
Get Document
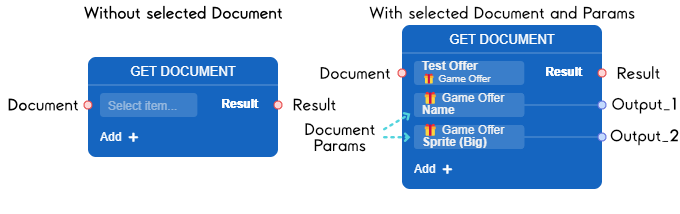
The Get Document Node is useful for accessing a document and being able to use it in your Scripts. The node takes in an input Document, which can either be passed in through a connection from another node or selected by clicking the Select item... button, and passes that document to the output Result port.
This node can also be used to access a document's parameters. Once you have selected the template and document you'd like to use, simply click on the + Add button on the node. A Select item... button connected to an Object output port should show up. Select the document parameter you'd like to access and connect its output port to use the parameter's value.
Find Document
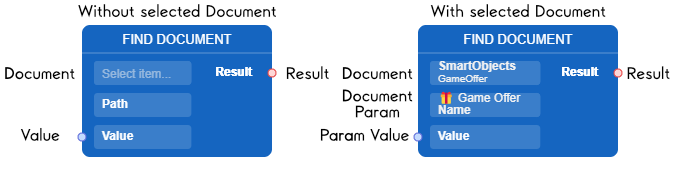
The Find Document Node is useful for finding a document that has the specific parameter values you are looking for. First, select the template of the document you wish to look for; click on the Select item... button on the node to select the template. Once the template is selected, the document parameter you want to compare values to must be selected. The selected parameter's value for each document of the selected template will then be compared to the value passed into the input Value port. The first document to be found that has the parameter equal to the Value passed will be returned through the output Result port. Otherwise, a null will be returned.
Create Document
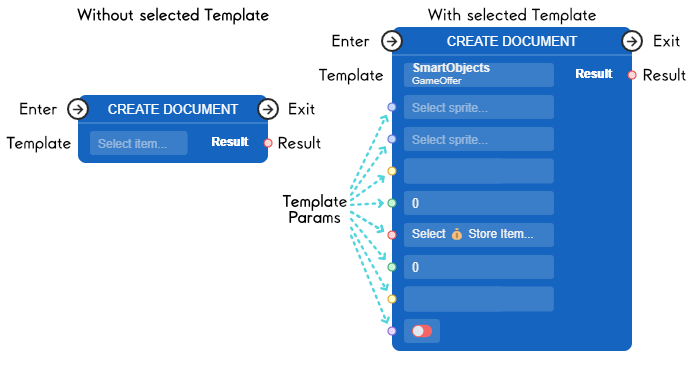
The Create Document Node is useful for creating a temporary document of the specified template within your Scripts. To create a document, first select the template of the document you wish to create. Once you select a template, input ports representing the document parameters will be created. You can either manually specify what each of the document parameters' values should be, or you can pass in the values from other nodes. The created document will then be returned through the output Result port.
Note: The created document using this node is only temporary; it will not show up in the document tables or anywhere outside the Script.
Time Nodes
Get Time Now
The Get Time Now Node returns the Admin Time (GMT+0) in Unix seconds.

Time: Event Nodes
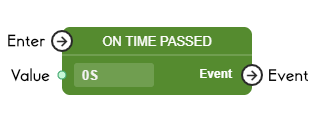
On Time Passed
The On Time Passed Node is an Event Node that notifies the connected node when the specified duration since the node has been activated has passed. Once the specified duration value from the input Value port has passed, this node runs the Event exit port.
This node is subscription node - that means that upon activation is subscribes for event and triggers when event happens. One activation results in one triggering. To subscribe again, the control Flow should etner this node again. If Enter port is left not connected, it will automatically subscribe once the script starts.
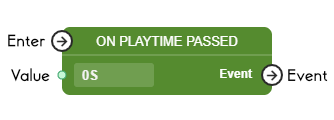
On PlayTime Passed
The On PlayTime Passed Node is an Event Node that notifies the connected node when the specified duration that the end user has spent in the game has passed. Once the specified duration value from the input Value port has passed, this node runs the Event exit port.
This node is subscription node - that means that upon activation is subscribes for event and triggers when event happens. One activation results in one triggering. To subscribe again, the control Flow should etner this node again. If Enter port is left not connected, it will automatically subscribe once the script starts.
Offer Nodes
Nodes within this section are for working directly with Game Offers and Game Offer Groups. Before using these nodes, please make sure that you have either Game Offers or Game Offer Groups created that you can work with. They can be created in the Offers & Items section of LiveOps.
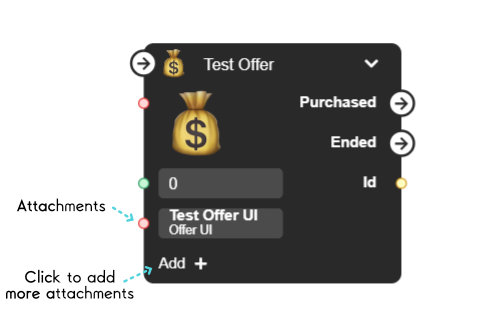
Activate Offer
The Activate Offer Node takes in a Game Offer, activates it, and returns a unique instance id for this activated Game Offer through the output Id port. The node takes in a Game Offer either by selecting it by clicking on the Select Game Offer... button on the node or by connecting into the input Id port and passing the Game Offer from another node.
You don't have to first select a Game Offer using the Select Game Offer... button to be able to connect into the input Id port; you should be able to connect to this port and the node will automatically transform to show that it is taking in a Game Offer from another node.
There are two exit ports that get triggered depending on how the end user reacts to the Game Offer: Purchased and Ended. If the Game Offer was accepted and purchased by the end user, the Purchased exit port runs; otherwise, if the end user exits the Game Offer or ignores the Game Offer, the Ended exit port runs instead.
Attachments can also be added to this node. Check out the Attachments section to learn more about this feature.
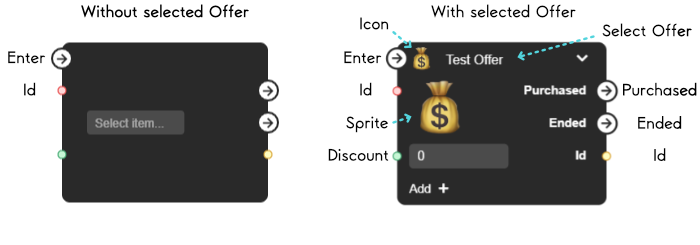
Discount parameter can be used to set up discount for an offer before activation. Discount is in %, so, for example, to make it 50% you shall put 50 in the field.
To make it work, products are being used. All these products shall be added to Dynamic Pricing list on In-game Store page. After that, if an offer is being activated with a discount, the following happens:
- New price is calculated as = current price * (1 - discount)
- The closest product by value from
Dynamic Pricinglist is taken as a new price - Discount is re-calculated as = (1 - new price/old price). It is needed, if the new price is too different from what was expected by initial discount provided.
- offerInfo is returned with final discount and the new price
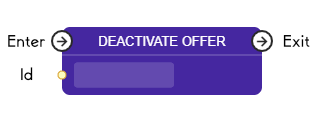
Deactivate Offer
The Deactivate Offer Node takes in the unique instance id of an activated Game Offer and deactivates it, ending the Game Offer for the end user. The unique instance id passed into the input Id port is the same instance id that the Activate Offer node outputs to its output Id port; simply connect both ports together if you wish to deactivate a Game Offer.
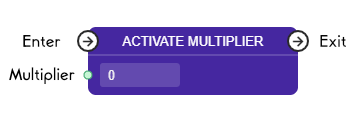
Activate Multiplier
The Activate Multiplier Node multiplies the rewards for specific Store Items by the multiplier value from the input Multiplier port. The specific Store Items that are multiplied rewards for are those that are in the Multiplied Store Items list in the In-Game Store, which can be found by clicking on the In-Game Store button to the right of the LiveOps section in the navigation panel.
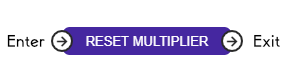
Reset Multiplier
The Reset Multiplier Node resets the multipliers applied to the specific Store Items specified in the Activate Multiplier node.
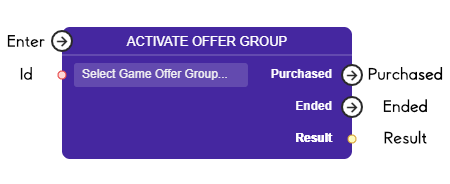
Activate Offer Group
Legacy Node
Please consider this node as legacy node and use Activate Offer node instead.
The Activate Offer Group Node takes in a Game Offer Group, activates it, and returns a unique instance id for this activated Game Offer Group through the output Id port. The node takes in a Game Offer Group either by selecting it by clicking on the Select Game Offer Group... button on the node or by connecting into the input Id port and passing the Game Offer from another node.
There are two exit ports that get triggered depending on how the end user reacts to the Game Offer: Purchased and Ended. If the Game Offer was accepted and purchased by the end user, the Purchased exit port runs; otherwise, if the end user exits the Game Offer or ignores the Game Offer, the Ended exit port runs instead.
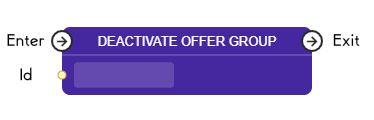
Deactivate Offer Group
Legacy Node
Please consider this node as legacy node and use Deactivate Offer node instead.
The Deactivate Offer Group Node takes in the unique instance id of an activated Game Offer Group and deactivates it, ending the Game Offer Group for the end user. The unique instance id passed into the input Id port is the same instance id that the Activate Offer Group node outputs to its output Result port; simply connect both ports together if you wish to deactivate a Game Offer Group.
Offers: Event Nodes
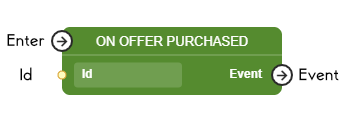
On Offer Purchased
The On Offer Purchased Node is an Event Node that notifies the connected node when the specified Game Offer has been purchased. The input Id port takes in a unique instance id of an activated Game Offer. Once the specified Game Offer from the input Value port has passed, the Event exit port runs.
This node is subscription node - that means that upon activation is subscribes for event and triggers when event happens. One activation results in one triggering. To subscribe again, the control Flow should etner this node again. If Enter port is left not connected, it will automatically subscribe once the script starts.
Misc Nodes
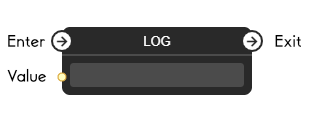
Log
The Log Node prints the value passed into the input Value port into the console in the game engine.
Reset Script
The Reset Script Node restarts the Script; effectively resetting the Script and its environment. This includes values stored in variables and any objects and lists passed around in the Script.
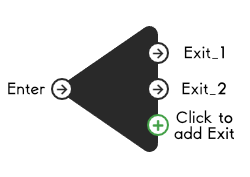
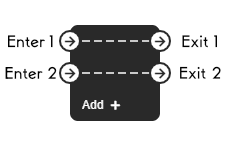
Parallel
The Parallel Node is used to run multiple nodes at the same time immediately after another node. Because of the Control Flow and the Link Rule stating that an Exit Port can connect to only one Enter Port, each node will have to wait for the previous node to finish to be able to run. Without the Parallel Node, there would be no way structuring your Script to run multiple nodes simultaneously. Note that this does not mean that the logic of the nodes will be run in a multithreaded way.
More exit ports can be added by clicking on the green + icon on the node.
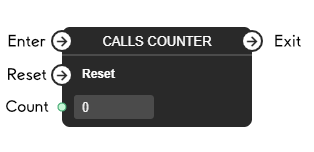
Calls Counter
The Calls Counter Node runs the Exit port only when this node is activated exactly as many times as the input Count port value specifies. Activating this node through its Reset enter port will reset the internal count the node keeps track of, and until it reaches the specified Count, it will not run the Exit port.
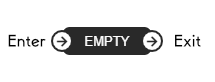
Empty
The Empty Node simply runs the Exit port when the node activates. This is used mainly to organize and clean up the connections in a Script, and are especially useful when looping the Control Flow to an earlier part of the Script.
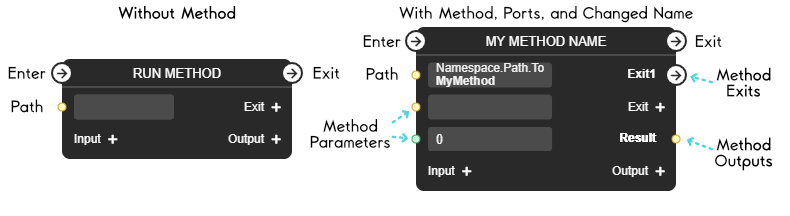
Run Method
The Run Method Node is for running a custom method that you made. This allows for adding some complex logic into your Scripts that are not usually possible within Visual Scripting. The path to the custom method needs to be set to the input Path port.
The node itself can be renamed to better reflect the name of your method; simply click on the Run Method at the top of the node. Exit, input, and output ports can also be added and named to fit your custom method better.
Check out the Running custom methods sections to learn more about creating your custom methods.
Limit
The Limit Node lets only the first Enter and Exit port pair that runs to continue running and blocks the other port pairs.
On Script Will Exit
The On Script Will Exit Node activates and runs the Exit port right before the Script is about to exit.

Execute Script
Scripts can execute other scripts the same way as using other functional nodes, by sending input values into input ports and getting result via exit ports. This is similar to procedural programming approach. It helps to structure complex scripts by splitting logic into blocks. It helps to create scripted functions which can be used in other scripts. Simply find the script at the bottom of the list of nodes when creating new node and select it as any other node.
Tips and Tricks
Event Nodes
When activated, Event Nodes will subscribe to the relevant event and will wait for an event to happen before running their Event exit ports. These events can be a change in the tracked values, an end user action, or checking if a condition is passed. Usually, the names of these nodes start with an On or Wait keyword.
However, once the event is triggered and the Event Node runs their exit ports, the node itself will have to be activated again to continue listening for their events. This involves looping back into and reconnecting to the Enter port of the Event Node to activate it again.
Furthermore, if there is no link connected to the Enter port of the Event Node, these nodes will be automatically activated once when the Script is launched.
Running custom methods
These are the requirements when creating your own custom method:
- The custom method must be in a public class under a namespace.
- The custom method must be a public and static method.
- The return type can only be either
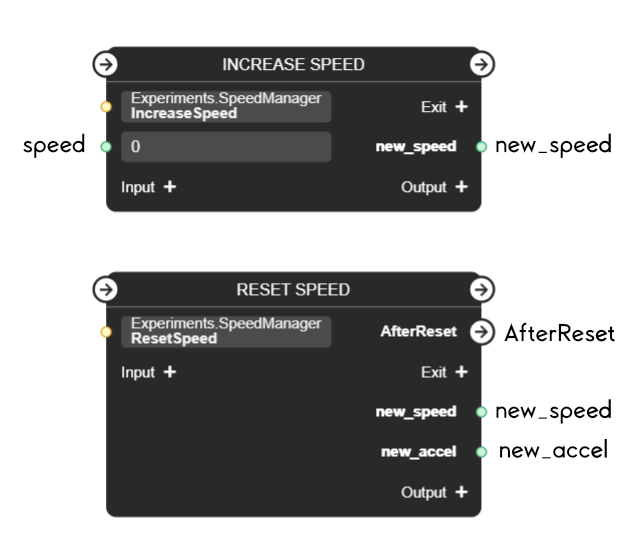
voidorNodeRunFunctionReturnType. - The method parameters must match the Input ports' names, their order and types on the related Run Method node. The name is case-sensitive and must be exact; this includes any symbols, like underscores, added in the name.
- If the related Run Method node has some Output ports, the
NodeRunFunctionReturnTypemust be returned with a Dictionary. The keys in this Dictionary are the Output port names, which is case-sensitive and must be matched exactly, including any symbols. The values in this Dictionary are the values to be passed to the Output ports. For example, if you have Output number ports namednew_speedandnew_accel, your method return must look like this:return new NodeRunFunctionReturnType( new Dictionary<string, object> { {"new_speed", 10}, {"new_accel", 9.81} } ); - If the related Run Method node has some Exit ports, you can return either
voidorNodeRunFunctionReturnType. If you return void, the Run Method node will simply run its defaultExitport. Otherwise, if you returnNodeRunFunctionReturnTypeand specify an Exit port to run, the Run Method node will instead run that Exit port upon finishing its logic. For example, if you have an Exit port namedAfterReset, it can be passed like so:Here is what a full custom method with its namespace might look like:return new NodeRunFunctionReturnType( new Dictionary<string, object> { {"new_speed", 10}, {"new_accel", 9.81} }, "AfterReset" );Afterwards, when you create your Run Method nodes, the paths to write into the input Path port would benamespace Experiments { public class SpeedManager { public static NodeRunFunctionReturnType IncreaseSpeed(int speed) { return new NodeRunFunctionReturnType( new Dictionary<string, object> { {"new_speed", speed * 2} } ); } public static NodeRunFunctionReturnType ResetSpeed() { return new NodeRunFunctionReturnType( new Dictionary<string, object> { {"new_speed", 10}, {"new_accel", 9.81} }, "AfterReset" ); } } }Experiments.SpeedManager.IncreaseSpeedandExperiments.SpeedManager.ResetSpeed.
Attachments
Some nodes can have other documents attached to them. These attached documents can be of any template. Currently, there are only two nodes that can have attachments:
A common use-case for this feature is to attach documents that describes the UI of the activated Game Offer. Once the Game Offer is activated, you can access the offerInfo from your code. This offerInfo contains information about your activated Game Offer, as well as the attached documents it has, which is stored in the offerInfo.Attachments property.
If the offer is purchased, those attachments are saved in the payment history with that purchase.
Now, when using Was Item Purchased node after that, your initial question actually means “Was the item with these attachments purchased?” So there will be AND logic: was it purchased, AND those attachments were attached to the payment.